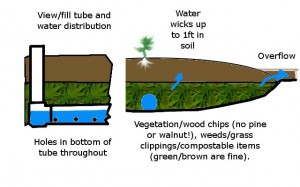
A wicking bed relies on the soils ability to wick water up to one foot in height. When properly constructed, it acts much like a saucer under a potted plant. The soil will draw up only as much moisture as it needs, and the roots can tap into it. Some of the added benefits include less evaporation, no need to surface water or spray (great for tomatoes), easily monitored, can be left for a number of days at a time, often weeks in the northeast without watering. The only difficulties are (as noted) the need to cover the filling hole, the remote possibility of the plastic getting punctured mid-way through the season (doubtful but worth being aware of), you still need to get plants and seedlings established.
To create our wicking bed, we dug a trench approximately six inches below the ground and four feet wide, then dug a three foot trench inside the first trench to accomodate six inch “wings” on either side. These “wings” are additional plastic that extends beyond the trench and are an ingenius safeguard: if it rains too much, the water spills over these wings and into the surrounding soil – no drowned plants, as long as it doesn’t rain for weeks on end.
Next, a tube was placed along the length of the bed. This will allow water to reach the whole bed unencumbered. There are holes along the entire pipe to allow the water to drain out into the surrounding material.
 On top and around the tube, plant matter of all types were placed until the bed was level with the “wings”. This included old weeds, comfrey, wood chips from everything except walnuts and pine tree varieties. Soil was then placed on top of the plant matter to create the planting bed. The bed is raised about one foot from the surrounding ground, and will wick any water in the trench upward to about one foot. The area over the “wings” can also be planted on.
On one end of the tube we buried, we put an elbow and another tube to fill the bed with and also to check to see if it’s filled. One thing we found out last year was that you have to cover the hole, otherwise you’ll have mosquitoes laying eggs inside! I cover it with a simple plastic bag and a rubber band. A better solution would be a cover with a float and a stick so I could see at a glance if it needed more water. If I save enough time this year, I may do that.
Tomorrow, hopefully, pictures (looking into the tube, I found no water inside. This may be a bad omen (a hole in the plastic)…


Recent Comments